Agfa Ansco PB 20 Readyset Folding Camera
Last significant update Jan. 21, 2006.Photos taken in 2005 with a digital camera.
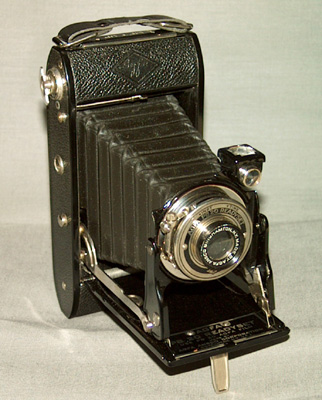
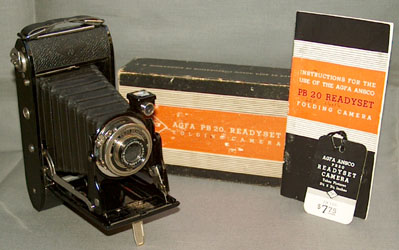
This was my dad's Agfa PB 20 Readyset camera that he bought in 1939, shortly after I was born. It is like new, in the original box, with the manual and price tag ($7.75). According to various inflation calculators, $7.75 in 1939 relates to $101.69 in 2005.
Other PB20 models are: Agfa PB20 Chief, Agfa PB20 Viking, Agfa PB20 Plenax, Agfa PB20 Major.
I think saying "Agfa PB20" is sort of like saying "Nikon 35mm".
CLICK HERE FOR MY FIRST TEST PHOTOGRAPHS.
(Not very good photographs -- I just like the technical part.)
CLICK HERE
FOR MY FIRST
COLOR
PHOTOGRAPHS (beside those shown below).
|
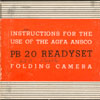
Click on image for the instruction book. |
|
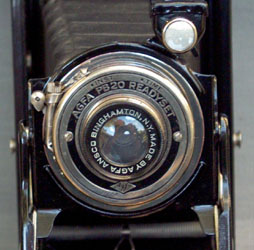
SPECIFICATIONS:
| Lens: | unknown |
| Lens focal length: | 105mm (measured) - more telephoto than wide angle |
| Shutter speed: | 1/50 sec. (measured*) |
| Aperture: | f/22 (calculated*) |
| Focus: | fixed at 10 feet to infinity |
| Field of view at 10 feet: | 5.3 feet x 7.7 feet (calculated) |
| Film size: | 620 (120) |
| Actual negative size: | 5.6mm x 8.1mm, or 2.205" x 3.189" (measured) |
| Print size: | 4" x 5.8" (calculated) |
| Pictures per roll: | 8 |
| Film speed for sunlight outdoors: | ISO 100 (measured by lightmeter) |
On the left is the original film spool holder which I removed as described below.
The price tag at lower right says $7.75.
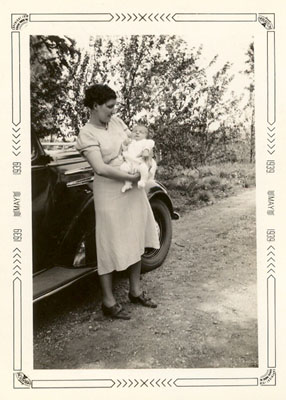
One of Dad's earliest pictures with this camera, Apr/May, 1939.
(That's me, 1 or 2 months old, and Mom.)
Me 66 years later with my granddaughter Colette
and 2000 Trans Am, Dec. 30, 2005,
taken with this camera.

First ever color photograph taken with this camera:
the Golden Gate Bridge and San Francisco,
November 11, 2005.
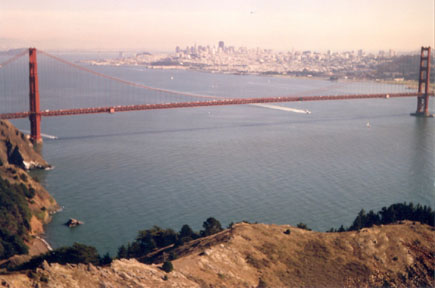
By barely being able to fit in the two towers of the bridge,
this is when I realized the lens is a short telephoto.
Note the poor focus on the bridge, and worse on the city.
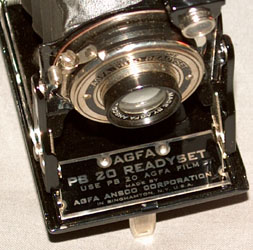
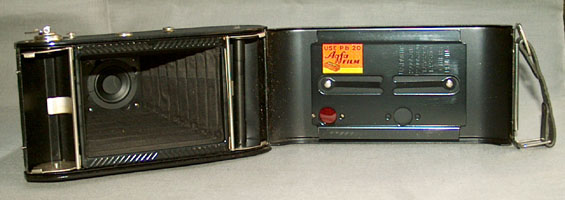
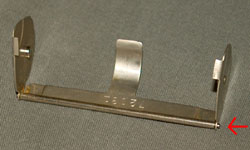
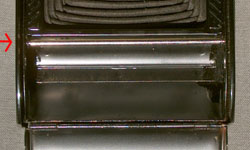
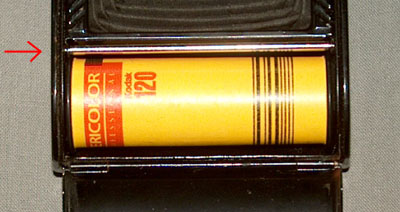
Since the film spool for the unexposed 120 film does not fit inside the spool holder, I removed the holder, took the roller bar out of the holder (top left, red arrow), and reinstalled only the roller bar (top right, red arrow). To remove the original spool holder, I used a pocket knife blade to spread the small tabs coming out of the bellows frame. After reinstalling the roller bar, I pushed the small tabs back.
The take-up 620 spool and spool holder require no modification.
NOTE: When I take the last picture and try to advance the film onto the take-up spindle, it jams. I have to open the camera in the dark, and lift out the film spindle to finish advancing the film.
The Readyset has a single shutter speed, a single f/stop, and a Time setting.
Using different methods, this camera is 105mm, 1/50 sec. at f/22.
1. I measured the aperture as 5mm, and focal length as 105mm. This would make it an f/21 (f/22) lens.
2. A focal length of 105mm makes it a short telephoto lens.
3. Using the spinning disk method shown below, shutter speed is 1/50 second. The actual calculation showed 1/50.2 - right on the mark.
4. Using the sunny f/16 rule, ISO 100 film would require a shutter speed of 1/100. If the shutter speed is actually 1/50, we would have to close down the aperture 1 stop, which would make it f/22. This validates the above measurements.
5. Using a lightmeter for incident light on a sunlit object, measurement for f/22 was 1/50 second with ISO 100 film.
I don't know the film speed of the old PB 20 film. I think it may have been 50.
This works only for behind-the-lens leaf shutters, not for focal plane shutters. This scheme and formulas were devised by me (Jim Hartsell), Nov. 28-30, 2005, with no knowledge of anyone else doing it this way.
The object is to take a picture of a spinning dark-colored disk that has a painted white line (glossy) or narrow white reflective strip from the center to the edge. I used a reflective strip 1/4" wide. The disk should turn one revolution in less than the shutter speed you are expecting, preferably half a revolution. This way you can measure the angle that the white line moved during the exposure. I made a 10" disk out of heavy poster cardboard, and with a 1/4" bolt, lockwashers, and nuts to be used with an electric drill. My drill has variable speed, which is good to start slow and gradually go to full speed so as not to "strip" the disk's connection to the bolt. After you do the photograph and stop the drill or motor, check to see that the disk hasn't slipped on the bolt.
Rear view of disk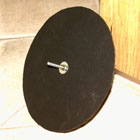 |
Front view of disk.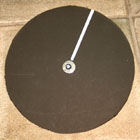 |
For the RPM needed for a shutter speed of 1/T, use the formula RPM = 30 x T.
| Shutter speed | RPM |
| 1/30 | 900 |
| 1/50 - 1/60 | 1500-1800 |
| 1/100 - 1/125 | 3000-3750 |
| 1/250 | 7500 |
If testing a shutter speed of 1/60, RPM = 30 x 60 = 1800. An RPM within 50% of this value would work, i.e. 900 to 2700 RPM, for 1/4 to 3/4 revolution during the exposure. The less the revolution during the exposure, the more pronounced the blurred white line will be (see the two side-by-side photos below).
FIRST, you need to calibrate the electric drill. For me, either the weight of the disk causes the electric drill to run slower, or the drill is just getting old. My 2500 RPM drill ran at 1800 RPM with the disk. So, the first thing to do is to measure the actual RPM of the spinning disk. I took several pictures with a trusted digital camera set at 1/T = 1/60 second, measured the angle A, and calculated the actual RPM with the formula RPM = (A * T) / 6. This of course assumes that the digital camera has an accurate shutter speed. My results were (180*60)/6 = 1800 RPM.
The spinning disk pictures below were made with a digital camera.
|
Disk with reflective strip.
Exposure was 1/60 second.
Drill was running a little slower than 1800 RPM this time.
I positioned the camera for best reflection. |
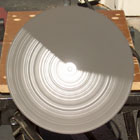
The spinning disk photos below were when my drill was in a better mood, but only a painted line.
1/60 sec. 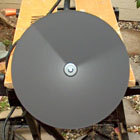 Almost 3/4 revolution. |
1/125 sec. About 1/3 revolution. |
DETERMINING SHUTTER SPEED OF THE OLD CAMERA:
When everything was set up, I bracketed the picture taken with the old camera with "before" and "after" pictures with a digital camera set at 1/60 sec. This makes sure there are no variances in the RPM. I scanned the resulting photographs and enlarged them to measure the angle the white line moved.
Measure angle A, then use the following formula for shutter speed 1/T:
              1
     T = -----------
              A
           -------
           6 x RPM
Example: For A = 240o, and RPM = 2000,
T = 1 / (240/(6 x 2000)) = 50.
Shutter speed = 1/50 sec.
Note: The original formula I derived below was mercifully reduced to the formula above.
                  1
     T = -------------------
             A         60
           -----  x  -----
            360       RPM
Even though the closest focus is 10 feet, you can still just about fill a vertical picture with a standing person because the focal length is 105mm, making it act like a telephoto lens. I calculated the field of view for a vertical photograph to be 7.7 feet.
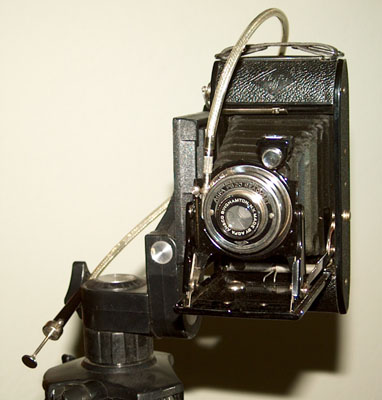
I don't know about you, but I have a terrible time trying to hand-hold the camera and use the tiny viewfinder. I don't know how my dad took such well-framed pictures.
I mount the Readyset on a tripod, attach a shutter cable release, and use a magnifying loupe to frame the picture in the viewfinder.
Knowing that the camera is probably f/22, I can use this setting (plus film speed) on my light meter to measure a time exposure for indoor existing light or other dim light conditions.
LONGER EXPOSURES:
For a stationary subject, and tripod-mounted with a cable release, you can use multiple exposures
to get a longer shutter speed.
(The following is assuming the camera's shutter speed is 1/50 second.)
2 clicks = 2/50 = 1/25 second (+1 stop).
4 clicks = 4/50 = 1/12 second (+2 stops).
8 clicks = 8/50 = 1/6 second (+3 stops).
USING FLASH INDOORS: You can take a flash picture with this camera in near darkness. With the shutter on Time, open the shutter, fire a flash, then close the shutter. With a Vivitar 283 flash, guide number 120 for ISO 100 film, the flash needs to be 5.5 feet from the subject, since the camera f/stop is f/22. (120 / 22 = 5.5')
Around 1961: Last photograph taken by my dad (on 620 B&W film).
Apr. 30, 2005: Camera was flown in carry-on luggage from Indiana to California.
Oct. 3, 2005: Adapted for use with 120 film.
Oct. 4, 2005: Determination of f/stop = f/22. Shutter speed probably 1/50 sec.
Oct. 5, 2005: First photograph on 120 film (B&W).
Oct. 6, 2005: First used on a tripod with a cable release.
Oct. 10, 2005: First daytime indoor photo (7 second exposure).
Oct. 12, 2005: First nighttime indoor flash while shutter was open.
Oct. 21, 2005: Got back the prints for the first roll of film. Looked okay!
Nov. 23, 2005: First color photograph. Something fitting. Golden Gate Bridge & San Francisco.
Jan. 11, 2006: Shutter speed determined by my spinning disk method (1/50 sec).
Little did my dad know in 1939 that I would grow up to major in physics in college, learn stuff that included geometric optics, have a hobby in photography back when it was all manual with lightmeters (early 1980's), have a fascination of his camera, have an occupation in computer software and internet programming, have my own website, and document his camera on the world wide web.
Useful links:
homepage.mac.com/mattdenton/photo/cameras/agfa_plenax.html: Agfa Ansco Plenax PB20; (Similar enough to the Readyset to provide clues.) Mentions "Film type PB20 (620)". Says that Agfa's designation for 120 was B2 and was PB20 for 620. Says that "620 film is 120 film on a slightly larger spool. A 120 spool doesn't fit inside this camera unless you take out the swingout clip on the film side. Then a 120 roll fits nearly perfectly and the film can then be threaded onto the old 620 takeup spool. Remember to ask for the 620 spool back when you get the film developed!" It also says "remember that 6x9 means only 8 frames on a 120 roll, and that if you don't turn carefully and keep your eye on the red window you can skip right past one of those little digits.
medfmt.8k.com/mf/folder.html: Medium Format Folder Cameras; Has many useful links. Says "The rule of "sunny 16" is that in bright daylight, with clear skies and dark shadows visible, you can set the camera aperture to f/16. The shutter speed will be 1 divided by the film ISO speed, so for ISO 100 film, the shutter speed will be 1/100th of a second."
medfmt.8k.com/mf/agfapb20.html: Agfa Ansco PB20 6x9 (Plenax) Folding Camera
www.zianet.com/connealy/vintagecameras/120in620 Using 120 Film in 620 Cameras; Says "now-obsolete 620 format". Nice article, with pictures.
www.toptown.com/nowhere/kypfer/120-620faq.htm: Using 120 Film in a 620 Camera
www.vintagephoto.tv/anscofilmtable.shtml: Using Vintage Ansco Roll Film Cameras; Says "Shutters may no longer operate accurately at their marked speeds. Figure they will tend to overexpose. Of course filters can be used to compensate for higher film speeds."
www.paulstiles.com/links/filminfo.htm: Table of Films vs. Camera.
www.cs.mtu.edu/~shene/DigiCam/User-Guide/filter/filter-ND.html: Neutral Density Filters; ND2 = density 0.30 = 1-stop reduction, ND4 = density 0.60 = 2-stop reduction, ND8 = density 0.90 = 3-stop reduction.
www.uscoles.com/fstop.htm: A Tedious Explanation of the f/stop; Says "the f/stop is the ratio between the diameter of the aperture in the lens and the focal length of the lens".
encyclopedia.laborlawtalk.com/f_number: f_number: Says that going in 1/3 f/stop steps, you have, for example, f/4, f/4.5, f/5, f/5.6, f/6.3, f/7.1, f/8, etc.